Got a brand-new subwoofer for that mighty bass, but are having some trouble with the installation process? Don’t worry: we’ve got your back! In this short, yet helpful guide, we’ll teach you how to get everything right. And you won’t even need an extra set of hands. Once you figure out the basics, the installation will turn out to be quite an easy task.
Table of Contents
Powered vs. Passive Subwoofer
Now, before we move on to the main part, there’s one thing that we need to talk about. There are two different types of subs on the market right now. We’ve got a Powered Car Subwoofer, and an unpowered one. Powered or active subs come with a built-in amplifier. That means they can run on their own, without an external device to “feed” them. Unpowered (AKA passive) subwoofers, in contrast, won’t be able to produce any sound.
Obviously, powered woofers are more expensive, but they’re easier to install. The reason: you’ll have fewer cables to handle. Plus, the chain of equipment will be smaller, which, again, results in a faster and hassle-free connection. With that out of the way, it’s time to answer the main question – how to install a subwoofer in your car?
What you’ll need for this
- An actual subwoofer
- An amp (for a passive set of woofers)
- Space in the car
- RCA cables
- A lot of wires (a kit will do)
Our Step-by-Step Guide
Finding the right Spot
It’s important to find the right space for your subwoofer.
Remember: a powered sub generates a lot of heat, which is why adequate ventilation should be ensured.
The trunk is the most popular spot for most vehicles, as it’s relatively open, spacey, and easy to access.
Getting Started
Most subs don’t include wires for installation.
 We recommend getting an all-inclusive type of wiring kit. It will come with not only all the necessary wires but also a couple of fuses (also important for the installation).
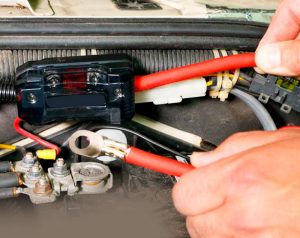
- First of all, disconnect the negative battery terminal. That way, you’ll protect yourself and all the gear/devices connected to the battery.
- Then, run the powered cable from that same battery to your newly-bought subwoofer.
- If the wire kit included a fuse assembly, that’s great news. If not, use basic “garage” tools to cut a piece of the provided power cable. Don’t forget to get rid of the insulation.
- The fuse holder should connect the terminal ring from the battery to the cable coming from the sub.
This is important: the closer the fuse is to the battery, the better. That’s because the lead coming from the terminal is unprotected (and potentially dangerous).
Taking Care of the Power Cable
- Unless you’re driving a really old vehicle, it shouldn’t be a problem to slide the power cable through the firewall.
Yes, we’re talking about the firewall that sits right in between the cabin and the engine bay.
- While in the cabin, pull the cable in. Next, hide it under the carpet so that it’s out of sight.
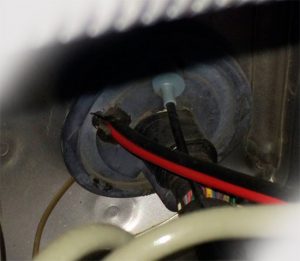
The Turn-On Wire and Signal (RCA) Cables Come Next
Doing well so far? Great, then let’s move on with our guide. What we should do now is connect the RCA cables and the turn-on wire to the car stereo.
- The stereo has a wire harness. Find the remote turn-on wire and connect it to the turn-on wire coming from the sub.
In most care stereo systems, it has a blue color (check with the manufacturer, though).
- The same goes for the RCA cables: just plug them into the respective outputs on the car stereo.
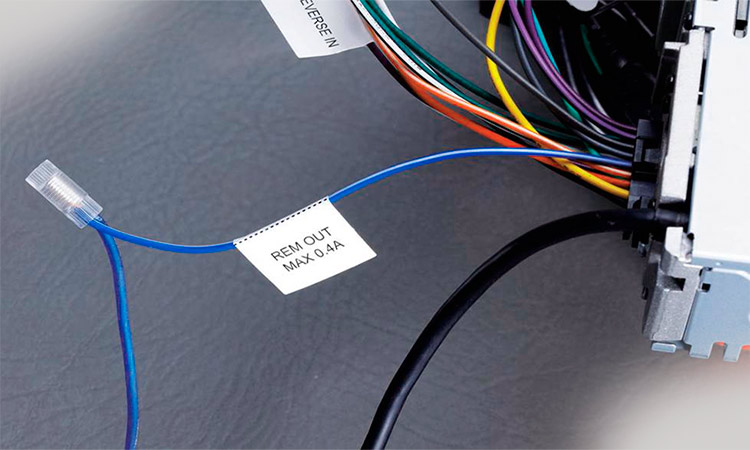
Ideally, the RCA cables and the turn-on wire should run down the opposite side of the vehicle where the power wire is.
This is done to prevent any noise (glitches and peaks) in the final audio output.
And if you want to further improve the bass response, you can build a bigger box for your woofer. It will look better and have improved overheating resistance.
You’ll find lots of guides if you search “how to build a subwoofer box” (Caraudiofabrication.com has some excellent designs).
First, figure out the right size, and then determine the available space in the car, and pick the right materials/tools.
We’re not going to get into that right now, though.
The Ground Wire
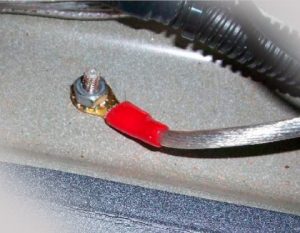 Next on the menu is the ground wire. It goes straight into the chassis.
- This is easy: find a proper bolt and just warp the ground wire around it.
The goal here is for the wire terminal to be in direct contact with the car’s metallic body.
- So, scratch the paint off. Otherwise, you won’t get the desired effect.
The Connections
 Last, but not least, take care of the connections.
- And before you turn the sub on for a test, don’t forget to set the built-in amp’s gain knob to zero.
- Do you remember when we disconnected the negative battery terminal? Well, now it’s time to reconnect it!
That’s it!
One final thing: if you’re wondering how to connect subwoofer to receiver without subwoofer output, we’ve got the right solution for that: a line output converter. As the name suggests, this device transforms the speaker level output to a low-level signal (RCA). That way, you can plug in any sub with at least one RCA input jack.
Conclusion
A subwoofer can greatly improve the audio quality in your car. However, unless you know what you’re doing, the installation will be hard. So, keep our manual/instructions close and follow it step-by-step when you decide to install a brand-new woofer in your vehicle. We’re confident that with our help, you’ll be done in no time and save money on paying a pro to handle everything.


Leave a Reply