Speaker wires – they come in all shapes and sizes. Some brands focus on the gauge; others work on improving resistance. And then there’s the sound quality. All those factors are very important, of course, but there’s one more aspect that you gotta always consider. I’m talking about cable length. You won’t believe how common it is for folks to get a brand-new audio system only to find out that the wires are too short.
So, what’s the solution here? What can the average user do to fix this? True, you could always buy longer wires, but that will cost a lot and take time. That’s why today, we’ll learn how to extend speaker wire. This might sound like rocket science, but it’s actually not. Follow my guide, and we’ll be done in no time!
Table of Contents
#1: Safety Comes First
Now, our goal today is to make the wires longer using regular, non-expensive tools. And the best thing about this job – it won’t take you much time or effort: all that you’ll have to do is disconnect the cables, measure the gauge size, and get the right wire at a local store. Connecting the wires will be the next step, and we’ve got four different ways to handle it. First things first, turn off the breakers.
That’s right: making sure you’ve switched off the power is the most important thing. You can’t be too careful when working with electricity! How do you know that you did, indeed, turn off the power? A multimeter will help with that. These are available for cheap and are very easy to use: just connect the “+” and “-“ nodes to the breaker and the multimeter will signal if there’s still a current left in there. Check the wires as well while you’re at it.
#2: Disconnecting the cables
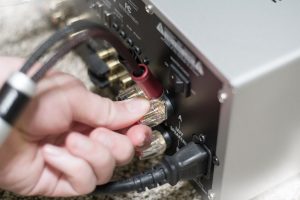 Depending on your home entertainment system, the speakers will either connect to a TV, computer, laptop, or directly into the power strip on the wall. On some older speakers, the wires will be connected through a set of screws – go ahead and unscrew them. Newer audio equipment goes right into the wall. So, just disconnect the cables, and that’s it.
The experts recommend labeling the wires. That way, it will be much easier to keep track of everything and remember which wire goes where. If you’ve got a relatively big setup, this will help you save lots of time (and nerves) after you’ve extended the cables and it’s time to reconnect everything.
#3: What you’ll need for the Job
Without the right tools, it will be pretty hard to get this done. Here’s a list of the necessary equipment:
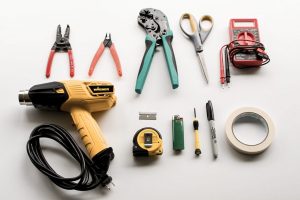
- I bet you already have a wire cutter at home. It’s the best tool for removing the wire cover, cutting the wire, and measuring its gauge.
- Next, we’ve got crimpers. As the name suggests, they have one job, and that’s to crimp the wires. Obviously, you’ll need a set of crimp connectors/splicers to connect the two separate wires. Or, better yet, get a “universal” cutter that can also crimp. It will be a great investment.
- With a soldering/heat gun, the idea is very straightforward: you just heat the two wires up to an extent that they “glue” to each other. If you were wondering – how to extend speaker wire for surround sound – soldering is the most effective and efficient technique.
- A set of wire nuts or shrink tubes. These are cheap, available both locally and online, and don’t take much effort to use. Which ones should you buy? Well, they’re both equally decent.
- Last, but not least, get the right wire gauge. If you don’t, the wires simply won’t be able to form a connection. Again: I’m not talking about the length of the cable, but rather its diameter.
The Best Wire Extension Techniques
Alright, now that we’ve got the basics out of the way, let’s take a quick look at the most effective methods of extending the speaker wire.
#1: Wire Nuts
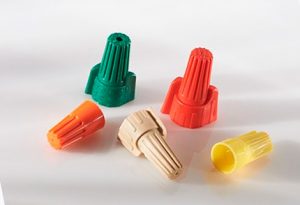 As mentioned, wire nuts are one of the quickest and easiest ways to extend your speaker wire. They do have one big downside, though: if you’re not careful and thorough, the wires will “slip off” over time. When that happens, expect electrical spikes and even fires – yep, pretty scary and dangerous stuff. On the bright side, if you do everything right, there won’t be any problems. Here’s my guide:
- Trim the wires (both the speaker wire and the one you bought for extension) and expose +/- an inch of pure metal. Use a wire cutter.
- Squeeze and pool – nothing hard about this part.
- Next, twist the two wires around each other and put the wire nut over them.
- Make sure both wires (the tips) reach the rear end of the nut.
- Twist the nut tightly, but don’t overdo it.
#2: Crimping
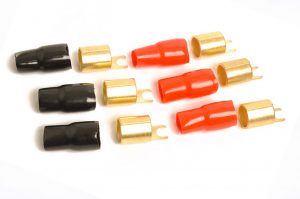 Here, we have another “user-friendly” technique. Crimping is fast and takes very little effort:
- Remove the rubber coating and slide the crimp connector on. Do this on both sides of the wire!
- Next, use the crimpers to give the connectors a nice squeeze. Go over the wires until you’re confident the “bond” is strong.
If you Google something like how to extend speaker wire Bose – crimping will be the #1 suggestion. Why is that? Well, Bose audio equipment is usually pretty expensive. With crimping, you won’t have to spend big bucks on the extension routine. Besides, this is one of the least “traumatic” techniques for the wires.
#3: Soldering
Soldering used to be very popular back in the day, and it still is. This isn’t a particularly easy method, though, but it is very reliable and durable. Plus, you’ll ensure premium sound quality, which is very important for, say, surround sound systems. Here’s what you should do:
- Twist the speaker wires so that they face upward. Use the cutter/crimper to peel off an inch of the copper.
- As for the extension wire, I want you to twist it a bit at the front end (the one that’s supposed to connect to the speaker wire).
- Grab the soldering/heat gun and get to work. The key here is to go slow and make regular stops. Otherwise, you might burn through the wires!
- Press the cables against the speaker node and solder them together. Repeat the process for all the speaker wires.
#4: Tubing
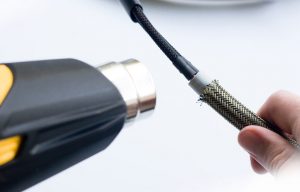 Last, but not least, we’ve got the so-called “shrink tubing” approach. It’s like the golden middle between crimping and soldering. All you’ll need is a heat gun and a shrink tube:
- Expose the wires (+/- one inch). The tube should sit in the middle of the “chain”, with the wires sliding into it from left and right.
- Remember: the wires need to touch while resting inside the tube. It might be wise to twist them together.
- Arm yourself with the heat/soldering gun and use it to melt the tube. Keep moving it; don’t focus on one spot for too long.


Leave a Reply